Protection counter is the counter for wasted ink; it says to
printer how much space it has in special tray where all wasted
ink are going during cleaning procedures. With time it became
full (printer just won't print in this case) and absorption
padding must be replaced. After replacing the padding You must
reset the protection counter to zero in order to continue
ordinary printing.
Do not reset protection counter if you didn't replaced the
ink pad! This can cause ink leakage and, as result, head damage!
Below You will find instructions to reset protection counter on
older printer models manually (25 printer models).
1) Turn off printer. 2) Replace waste ink pad. 3) Perform reset instructions provided for Your printer model
below. 4) Turn off printer.
EPSON 7600/9600 Turn on power pressing and holding PAPER SOURCE,PAPER
FEED,CUT/EJECT. Release all buttons. Manu should appear. Press DOWN, CLEAR
COUNTER option should appear. Press RIGHT then UP - you must see MAIN TANK. Press RIGHT then ENTER (CUT/EJECT). Power Clean Option. Control Panel operation sequence. Ready. Selectype. Printer Setup. Scrool down to Maintenance.
Selectype. Power Cleaning,. Selectype. Exec. Press Eject.
EPSON R300 Turn on power. Press and hold STOP, MAINTENANCE and POWER buttons then turn off the power when prompted.
EPSON Photo 950, 960 Turn the printer on with the Roll Paper SW and Paper SW pressed. Paper and Ink indicators will flash for
3 seconds. During this time, momentarily release the roll paper
switch, and then press and hold the switch again for 10 seconds. When the printer checks the maintenance error function, the
front LEDs will light for 2 seconds, and the printer will then
change to standby mode. Turn off printer.
EPSON RX500 Press all following buttons :Power, Load/Eject, Stop, B&W,
Color, after this printer turns on and you'll see "Init eeprom"
on printer screen. Press Color button to clear protection counter.
EPSON RX600 Press all following buttons : Power, B&W, Color, then, on
demand (you'll see message on printer screen), turn off printer.
EPSON C80 Hold down both the paper and ink buttons while you turn on
the power. When the paper out LED is just flashing release both buttons and
press and hold the ink-cleaning button for at least 10 seconds.
The printer will cycle through and self check for about 3
minutes and then function normally.
EPSON 2100 Switch on the power holding buttons one and three (ROLL
PAPER and SHEET FEEDER). Then hold button one down for 10 seconds.
EPSON Stylus Color Pressing and holding ALT+FONT+LOAD+PAUSE buttons
combination, press POWER button. Release all buttons.
EPSON Stylus Color 300 Pressing and holding LOAD/EJECT and CLEANING buttons, press
POWER button and hold it until You will see blinking INK OUT and
PAPER OUT leds. Release all buttons. In 2-3 seconds time press LOAD/EJECT and CLEANING buttons again.
EPSON Stylus Color 400, 600 Pressing and holding LOAD/EJECT and CLEANING buttons, press
POWER button and hold it until You will see blinking INK OUT and
PAPER OUT leds. Release all buttons. In 2-3 seconds time press and release LOAD/EJECT button.
EPSON Stylus Color 440, 640, 740, 460, 660, 670, 760, 860,
880, 1160 Pressing and holding LOAD/EJECT and CLEANING buttons, press
POWER button and hold it until You will see blinking INK OUT and
PAPER OUT leds. Release all buttons. In 2-3 seconds time press and hold CLEANING button, until all
leds will blink.
EPSON Stylus Color 680 Pressing and holding LOAD/EJECT and CLEANING buttons, press
POWER button and hold it until You will see blinking INK OUT and
PAPER OUT leds. Release all buttons. In 2-3 seconds time press and hold LOAD/EJECT button, until all
leds will blink.
EPSON Stylus Color 800, 850 Pressing and holding LOAD, CLEANING Color and CLEANING Black
buttons, press POWER button and hold it until You will see
blinking INK OUT and PAPER OUT leds. Release all buttons. In 2-3 seconds time press and release CLEANING Color button, You
will see leds blinking.
EPSON Stylus Color 900, 980 Pressing and holding LOAD/EJECT and CLEANING buttons, press
POWER button, You will see blinking INK OUT led. Release all buttons. In 2-3 seconds time press and hold CLEANING button for 10-12
seconds.
EPSON Stylus Color 3000 Pressing and holding PAUSE, LF/FF and DOWN ARROW buttons
turn on printer. Release all buttons.
EPSON Stylus Photo 785, 895 Pressing and holding Maintenance and Roll Paper buttons,
press POWER button, You will see blinking Error led. Release all buttons. In 2-3 seconds time until led is blinking press and hold for
10-12 seconds Roll Paper button, until all leds will blink.
EPSON Stylus Photo 890, 1280, 1290 Pressing and holding Maintenance and Roll Paper buttons,
press POWER button, You will see blinking Power led. Release all buttons. In 2-3 seconds time until led is blinking press and hold for
10-12 seconds Roll Paper button, until all leds will blink.
EPSON Stylus 1520 Turn on printer holding the following buttons : Alt, LF/FF,
Load/Eject, Micro Adjust.
EPSON Stylus Color II, IIS, 400, 600, 640. Turn printer on and off 5 times using Power button.
VI. Waste Ink MOD (Super
Advance User ONLY)
1. MOD at you OWN RISK!(You may void you printer
warranty) DON'T BLAME ME IF YOU DESTROY YOUR OWN
PRINTER
2. Items required;
a. Know how to dismantle your printer
without spoiling it and fix it back again! b. Ready to curse and swear when you cant fix you
printer back again! c. Spare $$ to buy a new printer when you spoil it even
AFTER I warned you NOT to do it! d. Plastic Tube Hose c.
Tube Connector f. Plastic Bottle
2. Open the printer and find for the
transparent tube with green/red
line at base of the printer
3. EXTEND the
green/red
line with the "Tube Connector" and "Plastic Tube
Hose". You MUST NOT PULL
the existing green/red
line. YOU MUST be very very careful when handling the
green/red
line, you may accidentally disconnect it from the printer
pump. IF this happens, you will be unable to clean you
printer head! Get ready to curse and swear!
4. Route the extended "Plastic Tube
Hose" thru the printer body.
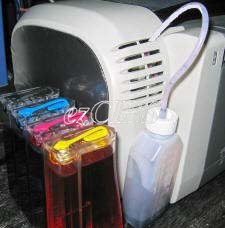
5. Connect the other end of the "Plastic
Tube Hose" to the "Plastic Bottle".
The "Plastic
Bottle" MUST be able to breath. This will allow
waste ink to flow into the bottle.
6. Try a Clean Print Head Cycle. IF
you don't see waste ink flowing into the bottle, get ready
to curse and swear!