|
Some may have realised by now,
that Canon has phased out the "Simple" cartridges with their current line of NEW
Printer / AIO models.
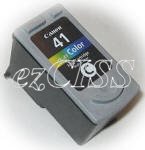
These new PG40/PG50/CL41/CL51
Cartridges are rather similar to HP style cartridges in design and functionality
with minor differences. Why is that so? Well, have you seen OEM
cartridges for those models yet? I doubt so, even if you do, It's
REMANUFACTURED. i.e. 2nd hand Cartridges.
With the printhead built into
the solid block cartridge, it thwarts the OEM market in offering affordable
alternatives. Thus, they (the manufacturer) reaps from the end consumer in the long run.
The Official SRP for PG-40 is
RM65.90 and CL-41 is RM80.90! Thus a new set will cost you
RM146.80!! How much did you buy your printer for again?
And to top if off.. you get a
estimated printing mileage of 16ml for black and 6ml for each
colour!!
Back to my original question
posed, are you paying for plastic or ink? See below, the white material is
SPONGE!
Sponge!!!!
|
|
Refill it!
If you just
need the refill ink, I can get it for
you. If you cant afford to fork out your
blood money to print with the above printer. Below is an idea for you. As
usual, note that you do so on your own risk, I do not take responsibility
for any misadventures!
 |
 |
 |
 |
|
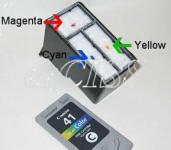
1. Put the cartridge on some
paper towels in an area where you can tolerate a spill.
2. Drill a hole into
the dimple just below the "B". |
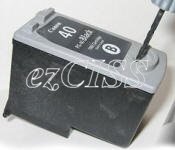
1.
Put the cartridge on some paper towels in an area where you can
tolerate a spill.
2.
Peal off the top label.
3. You
will notice three small holes (too small for a syringe needle to get
into). Drill each hole larger with a thumb drill. |
|
 |
 |
|
3. Fill the syringe with
20ml of black ink.
4. Very SLOWLY inject
ink into the hole OR until the sponge full. (using a
fine syringe needle)
5. When finished,
put a small piece of tape over the drilled hole.
6. Replace the cartridge and
run 1 - 3 cleaning cycles
7.If necessary leave cartridge in printer for up to 24 hours, this
allows the ink to flow to the print head.
|
4.
Fill the syringe with
6 ml of each colour ink.
5.
Very SLOWLY inject ink into each chamber OR until the
sponge full. (using a fine syringe needle)
6.
When finished, put a small piece of tape over each
drilled hole.
7.
Replace the cartridge and run 1 - 3 cleaning cycles
8.If necessary leave
cartridge in printer for up to 24 hours, this allows the ink to flow to
the print head.
|
|
Each time the cartridge is removed from the printer an empty cartridge
message appears and a blinking amber light will come on.
|
IP1200 / IP1600 /
IP2200 |
MP150 / MP170 |
|
 |
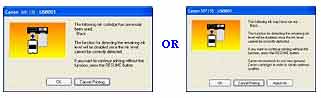 |
In
either case, pressing the RESUME/CANCEL
button cancels the error indication and enables continuation
of printing. However, error detection function is disabled
after the error indication is canceled, therefore,
Low Ink Warning message does not appear
later on. When you install new FINE Cartridge, Low Ink
Warning is enabled automatically.
|
In
either case, clicking Black/Colour Button cancels the
error indication and enables continuation of printing. However,
the error detection function is disabled after the error
indication is cancelled, therefore, Low Ink Warning
message does not appear later on. When you install a new FINE
Cartridge, the Low Ink Warning is enabled automatically. |
|
 |
 |
|
SInce the Low Ink
Warning message does not appear later on, you just have to
consistently monitor your printouts, as you will not be know
when your refilled cartridge will run out of ink. |
|
Epilogue
Depending on how much you print, you have to repeat
the above steps ever so often! It is a cumbersome affair, but its an
affordable alternative. However, do note that the printhead was NOT
designed for durability, thus eventually you would still have to get a
new Original set of cartridges upon printhead failure. That's just how it
is. |